
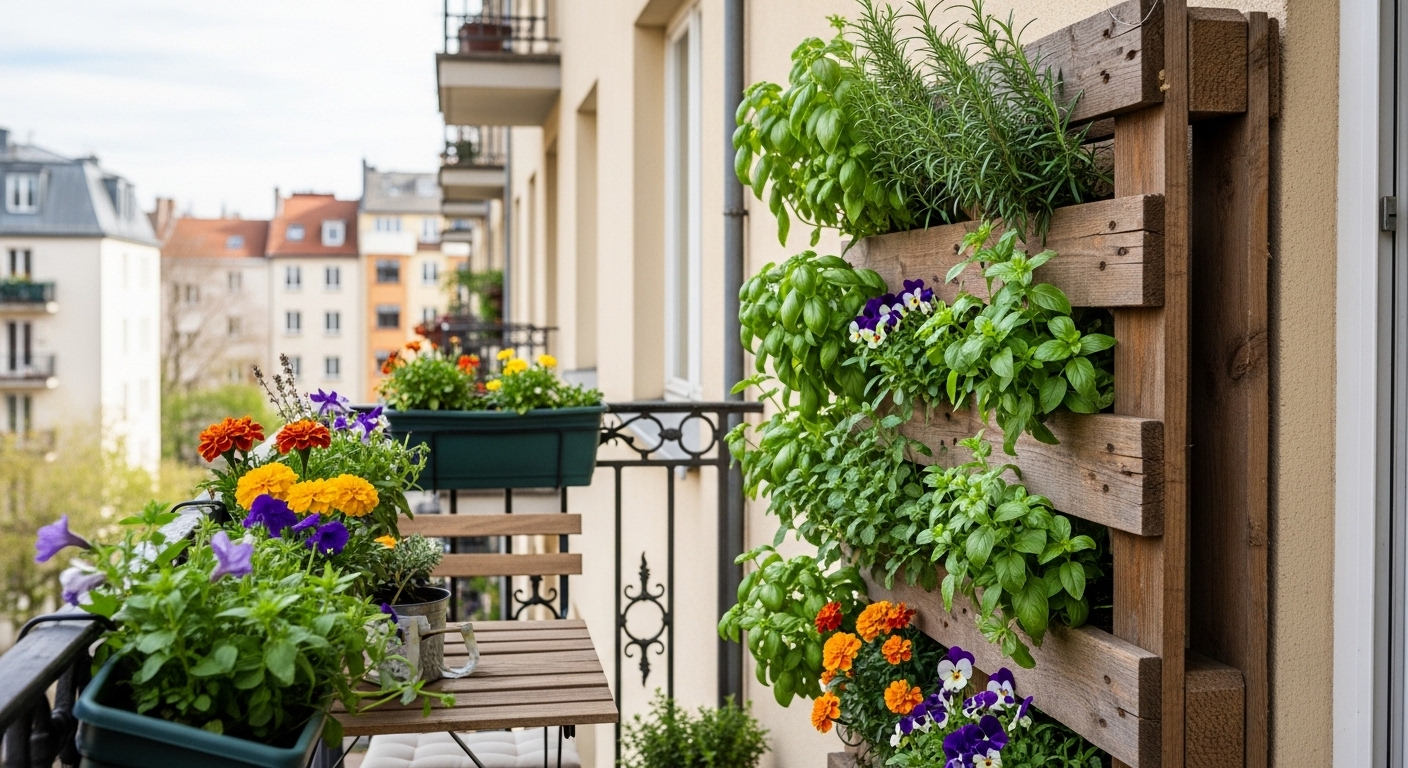
In urban areas, garden space is reducing substantially over time. At the same time, the interest in cultivating our own plants and food at home is booming. If you have a balcony or a patio of just a few square meters and dream of greenery, you do not need a huge piece of land. You only need to raise your eyes higher. Learning how to make a vertical pallet garden is a wonderful idea to convert your small, bare vertical spaces into green walls full of herbs, flowers, and vegetables.
Going vertical with gardening is not just a fashionable idea; it is an efficient way to live nowadays. By turning a simple wooden shipping pallet into a garden, you will get a gorgeous, functional garden that hardly takes up any floor space. Whatever your level of experience in gardening is, if you want to do a weekend project or if you are a complete beginner and wish to grow your first basil plant, this article will help you out. We will talk about all the steps from getting the right pallet to picking your first strawberry.
Why Choose a Vertical Pallet Garden?
Before you get your hammer out, let’s discuss what makes this DIY project so popular among homeowners and renters.
Space-Saving Miracle
Space-saving is the first thing anybody would recognize as a benefit. Traditional gardens need a certain amount of ground area. A vertical pallet garden, on the other hand, makes use of the wall or the fence, thus leaving your floor free for furniture or people. You can consider it the ultimate apartment balcony, small deck, or narrow backyard side yard hack.
Cost-Effective Gardening
The fact that gardening is a pricey hobby discourages many from starting. You can quickly run up a bill with raised beds, fancy pots, and fees for landscaping. On the other hand, pallets can be free of charge or almost free. Numerous businesses give away pallets just to get rid of them. When you upcycle a pallet, you save on the structure, thus, have more money for premium soil and nice plants.
Environmentally Friendly
We live in a throwaway culture, but by finding a second use for a wooden pallet, you helpkeep the landfill less full. Here you are taking a piece of industrial stuff and turning it into a nature vessel. Choosing to do it is a sustainable behavior that lowers your carbon footprint.
Aesthetic Appeal
The pallet garden has a rustic charm that is hard to deny. It contributes to the feel and the visual interest in a room. It will be a centerpiece that is an outdoor art, a living piece that changes with the time of the year, whether you paint the wood vibrant or leave it raw and weathered.
Ease of Access
Normally, middle-aged people tend to avoid gardening as it may be hard on their backs and knees with the constant bending and kneeling. However, when you have a vertical garden, you can easily install it at a level that is comfortable for you. In turn, you will be able to prune, water, and harvest standing up. Apart from people with mobility issues, any gardener who just wants a more ergonomic experience may also benefit from the method.
Materials and Tools You’ll Need
Success starts with preparation. Gathering the right supplies ensures your project goes smoothly.
Pallet Selection
This is the most critical step. Not all pallets are created equal. You need a pallet that is safe for growing plants, especially if you plan to eat what you grow.
- Look for the “HT” Stamp: This means the wood was treated with heat rather than toxic chemicals to prevent pests.
- Avoid “MB” Stamps: This means Methyl Bromide, a harmful pesticide. Don’t use these pallets for gardening.
- Check the Condition: Don’t use pallets that are stained with oil, have mildew, or are extensively broken. Try to get a strong frame.
Essential Tools
You most probably have the majority of these in your toolbox:
- Safety Gear: Work gloves and safety glasses are necessary to protect your hands and eyes from splinters, nails, and dust.
- Staple Gun: A heavy-duty staple gun is a must for stapling the fabric tightly.
- Landscape Fabric: It is a fabric that keeps the soil from the pallet while water is able to drain out. Without it, you will end up with soil all over the place.
- Measuring Tape: Always try to avoid waste. Take only what you need.
- Scissors: You will use them to cut the fabric.
- Sandpaper or Electric Sander: Pick either one for removing rough surfaces and small protrusions.
- Hammer and Nails: Sometimes it is necessary to fix a broken slat or two with nails and a hammer.
Soil and Plants
- Potting Mix: Please, don’t use garden soil. It is too heavy and will compress your plants’ roots pretty quickly. Instead, go for a light, fluffy potting soil mix that has been specifically designed for use in containers. This type of mix provides good drainage and root aeration.
- Plants: We will get into the details of plant selection later, but for now, you can start envisaging herbs, leafy greens, or trailing flowers in your vertical garden.
Other Materials
- Staples: It is advisable to get good value packs of staples to refill your staple gun as required.
- Screws/Mounting Hardware: If you intend to hang the pallet on the wall, make sure you have heavy-duty brackets or screws that are up to the task of holding the weight of the wet soil.
Step-by-step guide: how to make a vertical pallet garden
If you are up for it, here are the instructions to create your palette, turning it into a flowering masterpiece.
Step 1: Pallet Preparation
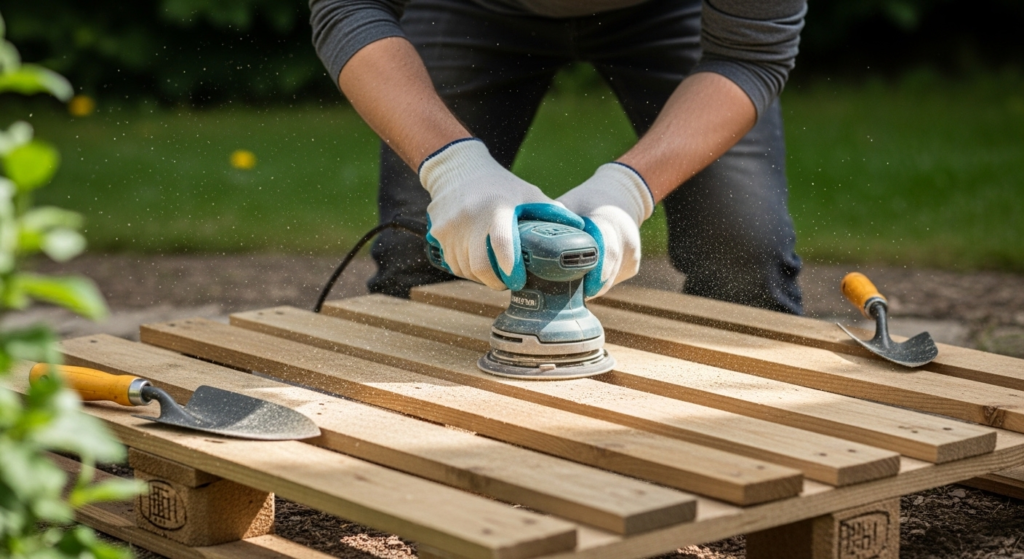
Initially, you have to clean your pallet well. Remove dirt, grime, and cobwebs by scrubbing with a brush dipped in warm soapy water. After that, leave it to dry nicely in the sun. Once dried, check the pallet for any nails that are protruding or pieces of wood that may be broken. Nail back any loosened bits and buff down the pallet by means of sanding. It is not like you should finish it as furniture, but you still want to get rid of splinters that are potentially dangerous to the skin. Double down on the parts of the pallet that will be mostly touched.
Optional. If you are after a certain look or just want your wood to be protected a bit longer, you can put on a coating of non-toxic wood sealer or outdoor paint. Let the wood fully dry before you start planting the garden.
Step 2: Securing the Landscape Fabric
This is where the magic happens. You need to create “pockets” or enclosed sections to hold the soil.
- Turn the pallet over: Lay it on the ground with the back side up.
- Protect the whole back: Unfold the landscaping fabric over the entire back of the pallet. Trim it to the desired size.
- Fasten with staples: Attach the fabric by means of staples to the main vertical beams and the horizontal slats. Using a lot of staples is essential to preventing soil from pushing through the back. Thoroughly staple the bottom half of the fabric.
- Make the bottoms of the pockets: Flip your pallet over. So, you have to make the bottom of the rows. Measure a length of fabric that will fit in the horizontal openings. Attach the fabric in two spots: the strip below the opening, and the already-fabricated back, by the use of staples. Just think of each level as a hammock for the soil.
Step 3: Adding Soil
Having ensured the soil pockets are secure and the pallet is near the right finishing spot or leaning firmly against a wall, it is time to add the soil. Before you apply the soil, the pallet could be moved quite easily, and it will always be a lot cleaner to transport that way anyway!
Fill the compartments with a good-quality, fresh mix of potting soil. Don’t fill the pockets entirely at this stage. Press the soil firmly using your hands, but don’t squeeze it so that water won’t be able to pass through later. Leave approximately 1 inch of space at the top of each compartment.
Step 4: Planting
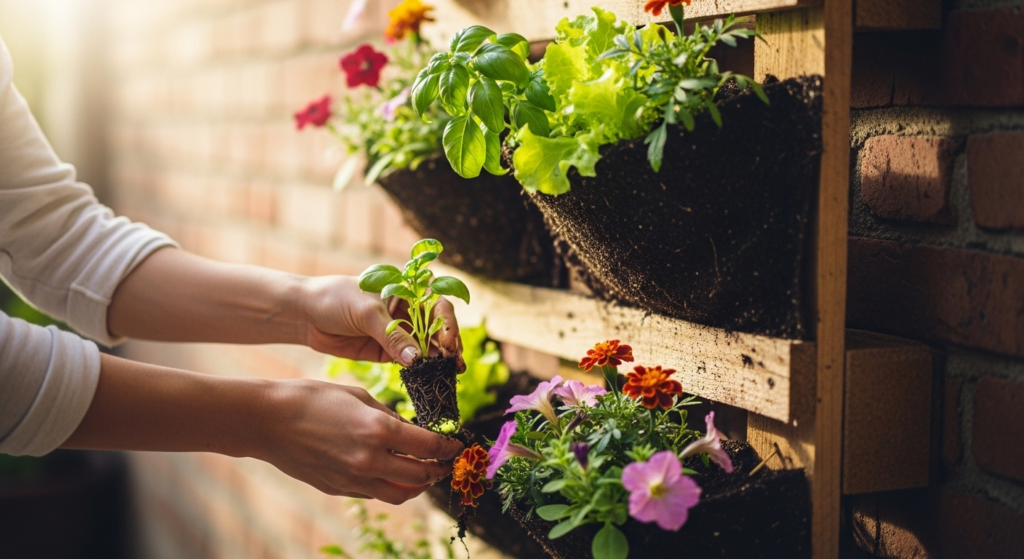
First and foremost, it’s always a good idea to lay out your plants while still in their nursery containers so you can better plan the arrangement.
- Top tier: Put sun-loving plants here as they will be getting the most light and will not be shaded by the slats above them.
- Bottom tier: This part could be really wet, so opt for moisture-loving plants. Carefully take plants out of the pots. Make a hole in the soil of the pallet pocket with your finger. Insert the plant and pack the soil around the roots. If there is not enough soil left, add some more.
Step 5: Watering and Initial Care
After finishing planting, water the whole garden to the point of saturation. Water must be allowed to flow and infiltrate from the top down. The first watering settles the soil around the roots. You might notice some of the soil being washed away; this is nothing to worry about. Just replenish the pockets if they seem low. Monitor your plants closely over the next two weeks as they settle in the new environment.
Choosing the Right Plants
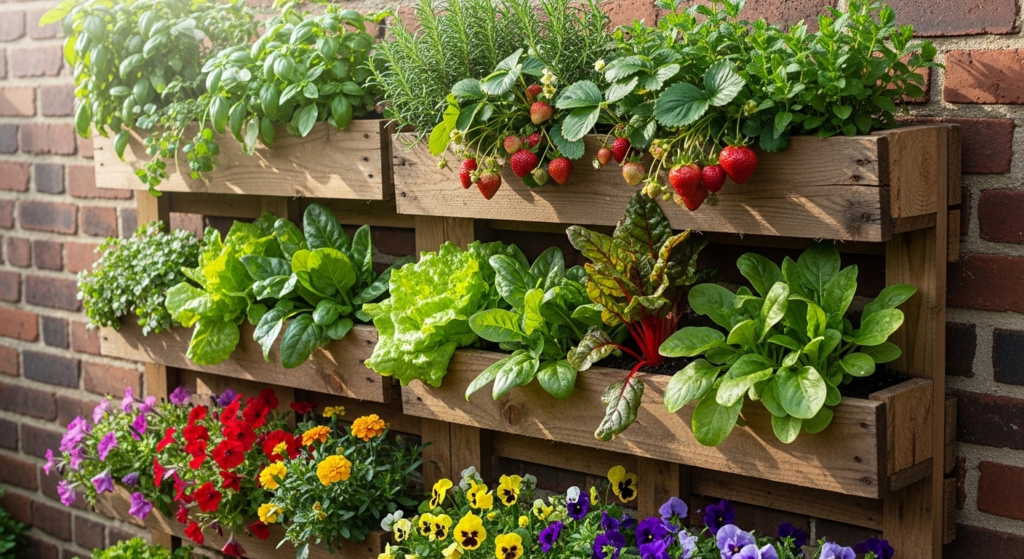
A pallet is not an ideal environment for every kind of plant. Since the amount of soil is limited, root vegetables such as carrots and big bushes simply will not fit. Stick to shallow-rooted species.
Herbs
Herbs make great partners for vertical gardens. They are sturdy, like well-drained soil, and are super handy in the kitchen.
- Basil: Grows best in the upper, brighter areas.
- Mint: Be careful—it can take over! Actually, the confined space of a pallet pocket is perfect for containing the invasive mint.
- Thyme and Oregano: These herbs will look very pretty hanging over the wooden slats as they trail.
- Parsley and Cilantro: Prefer a little shade and cooler temperature, so good candidates for pallet pockets in a less bright location.
Vegetables
The wall might surprise you as a plantable space!
- Strawberries: Kids always love these berries. Plus, the fruit doesn’t get dirty (insects stay away!).
- Lettuce and Spinach: Greens have very short roots and are fast growers. You can pick the leaves on the outside while the center keeps growing.
- Radishes: The round radishes work great for pallet gardening because of their shallow roots.
Flowers
Brighten up your walls with flowers.
- Petunias: Bring in colors that pop; they’ll also hang down to cover the wood naturally.
- Pansies: Nice during spring and fall when the rest of the plants are not active.
- Impatiens: Great choice for a shady patio location.
- Marigolds: They are tough and can even repel some insects that might harm your vegetable plants.
Succulents
If your wish is a low-maintenance, drought-tolerant plant choice, consider succulents for your palette.
- Sedum and Sempervivum (Hens and Chicks): They are hardy, colorful, and use water sparingly.
- Echeveria: Their rosette shape makes for a delightful living mosaic.
Pro Tip: It is advisable to always keep together plants with similar requirements. A lettuce plant, which needs a lot of water, and a rosemary bush, which can survive drought, should not be placed next to each other.
Maintenance Tips
There are quite a few different things that you have to focus on when you have a vertical garden compared to when you have a traditional garden. One of these things is that the soil pockets are relatively small and, on top of that, they are exposed to air from several sides. Due to these conditions, they can become dry really quickly.
Watering
You really can’t be too consistent. You may even have to water every day on hot summer days. The moisture of the soil should be checked by sticking your finger about an inch into the dirt. If your finger comes out dry, then you should water the plants. Drip irrigation system installation should be considered if you want to automate this process. It saves time and ensures even moisture.
Fertilizing
Nutrients disappear from containers faster than from garden beds. During the growth period of the plants, you need to nourish them with a liquid fertilizer derived from organics every two to four weeks. A balanced and water-soluble fertilizer is preferable for expedited delivery of nutrients to the roots.
Pruning
Pruning is highly encouraged, especially when growing herbs, e.g., basil, as it stimulates the plant to grow fuller. Pruning is one way to keep a herb garden looking neat and tidy. Remember to take care of the plants’ vigour by removing dead leaves and spent flowers (deadheading). In case the trailing plants have been left to grow and are now casting a shadow on the plants that are underneath, pruning them becomes necessary.
Pest Control
There are no pest problems in vertical gardens quite as often as in conventional gardens due to the elevation of the former. This, however, does not mean that they do not attract pests.
- Aphids: Use a strong jet of water from the hose to knock them off your plants or resort to insecticidal soap.
- Slugs: They are not really fans of climbing rough wood, so if you discover them, then pick them up at a time when they are most active in the evening.
- Fungus: It is crucial not to restrict ventilation. When plants are too crowded, a lot of moisture can accumulate, giving rise to mildew. Therefore, thinning should be done in advance so as to avoid such situations.
Winterizing
In the event of living in a cold region, pallet gardens have to be protected, as the roots that are above the ground are more vulnerable to freezing.
- Move it: Assuming the pallet is not fixed in place, take it into a garage or shed.
- Cover it: Wrap the pallet in burlap or horticultural fleece to insulate the roots.
- Empty it: Annual plants- compost the old plants and soil. Clean and dry the pallet for storage until next spring.
Design Ideas and Customization
There is no requirement that your vertical pallet garden should be exactly like others’. Be creative with the design and finishing.
Layout
- Rainbow Row: Plant a gradient of colors for a stunning visual effect.
- The Kitchen Garden: Hang your pallet near the kitchen door, and fill it with the setting-process herbs only.
- The Cocktail Garden: Plant mint for mojitos, basil for garnish, and strawberries for daiquiris.
Decorative Touches
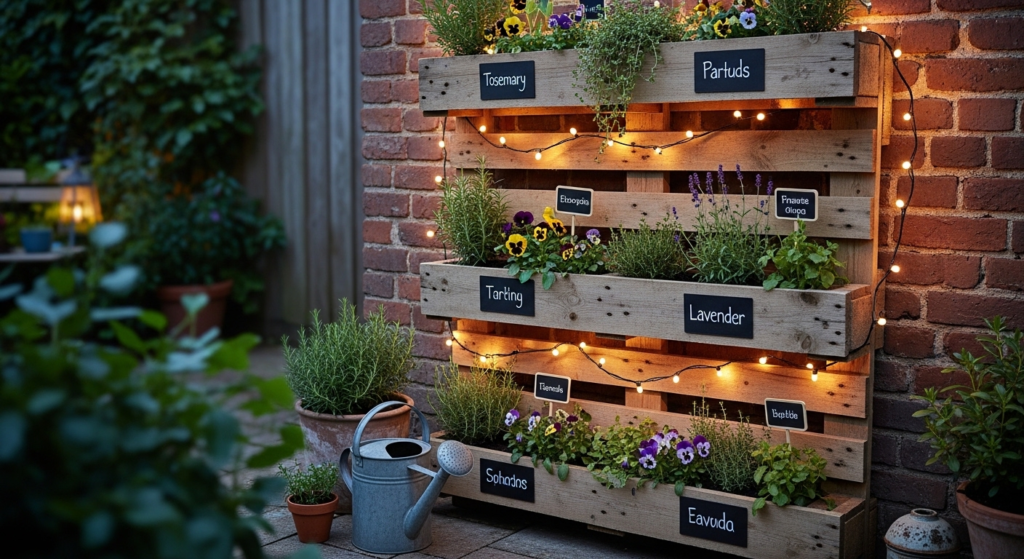
- Chalkboard Paint: You can paint the wood with chalkboard paint, and the herb names can be directly written onto the wood.
- Lighting: Create magical evenings around yourpalettet by stringing up solar fairy lights.
- Hooks: At the bottom of the pall, install small hooks with screws. Use the hooks to hang garden tools or watering cans.
Conclusion
If you make a vertical pallet garden, it will be a pleasure getting fresh herbs, even if you don’t have a big yard. It is not only a creative, environmentally friendly, and practical way to go, but also a rustic one. You are on your way to harvesting fresh herbs and delighting in lovely blooms by just following this guide. Thus, go out and get that perfect pallet, potting soil, and the plants, and start the process of gardening!