
How to organize a garden shed. Are you tired of always running into rakes and misplacing your favorite trowel? If so, you are probably wondering how to effectively organize a garden shed. We can all relate to that moment when you open the shed door and find that chaos has taken over, thanks to tools, pots, and half-empty bags of potting soil piled everywhere. A messy shed is not only unattractive, but it also lowers your gardening motivation and poses safety hazards.
Don’t fear clutter; transforming the mess in your shed into a functioning workspace is easier than you imagine. You can make a gardener’s dream even from the smallest and most chaotic space if you follow a plan. This guide is designed to take you through all the required steps so that your tools will be at hand, your space will be utilized, and your shed will be clean and orderly for a long time.
Assessing Your Shed’s Current State
Before you set out to purchase one storage bin or put up a nail, you need to have a clear picture of what you are facing. It is impossible to organize clutter and to establish a system when you have no idea what needs to be stored.
The Great Emptying
Nothing beats starting over with a totally bare surface. Choose a day with nice weather and carry all the things outdoors. Take out the lawnmower, the stacks of pots, the hoses that are all tangled, and the rusted tools. Spread everything on the lawn or driveway. Having everything out in the open light makes you aware of how many things you have and also helps you identify duplicates and broken items.
Evaluate the Structure
After emptying the shed, check the premises. Look around for water stains, damaged floorboards, and signs of pests. Make sure that the shelves are solid and that the hooks are well fastened. There is no point in organizing a shed if the issue of water dripping onto your power tools is not addressed. After structural repairs, cleaning will be a pleasure.
Inventory and Categorization
As you take out particular things, put them together in groups. Usual ones recognized are:
- Long tools: Shovels, rakes, hoes, and brooms.
- Hand tools: Trowels, pruners, shears, and weeders.
- Power tools: Lawnmowers, grass trimmers, leaf blowers, and chainsaws.
- Gardening supplies: Pots, planters, soil, fertilizer, and seeds.
- Maintenance equipment: Oil, gas cans, spare parts, and extension cords.
- Seasonal products: Patio furniture cushions, pool toys, or holiday decorations.
This tangible stocktaking allows you to picture how much space each group will need.
Planning & Preparation
Once you have emptied your shed and checked what treasures you have, prep the area and the items for their comeback. This part is very important if you want your neatness to last for a long time.
The Ruthless Declutter
This is undoubtedly the hardest but also the most satisfying action. Walk among your dilapidated piles on the lawn. If you have got three rusty small shovels (trowels), then choose the best one for yourself and discard the rest. If a tool is broken and you haven’t fixed it in a year, you likely never will get rid of it. The dates on chemicals and fertilizers should be renewed. Dispose of hazardous materials as per your local waste management guidelines. Give away the items that you have duplicates of and are in good condition to the local community garden or the charity shop.
Deep Cleaning
A dirty shed not only looks unattractive but is also a haven for pests and spiders. Take this chance to wash the room thoroughly from the floor to the ceiling. Use a broom to clear the cobwebs from the rafters and corners. Apply a mix of water and mild detergent to wash the walls. Sweep the floor rigorously, and if the wood is looking a bit worn, maybe a new paint or sealant layer would give it a fresh look. Being in a neat and bright area naturally motivates you to keep it up.
Measuring for Success
Take out your measuring tape to size up the wall space available, the floor, and also the depth of your shelves. These dimensions must be known to you before going to the store to get any new storage solutions. Draw up a floor plan of your shed on a piece of paper and mark the spots where you want your different zones or areas to be established. For example, it makes sense to locate the lawnmower near the door for it to be accessed easily, whereas the seasonal stuff can be put in the farthest corner or kept up high.
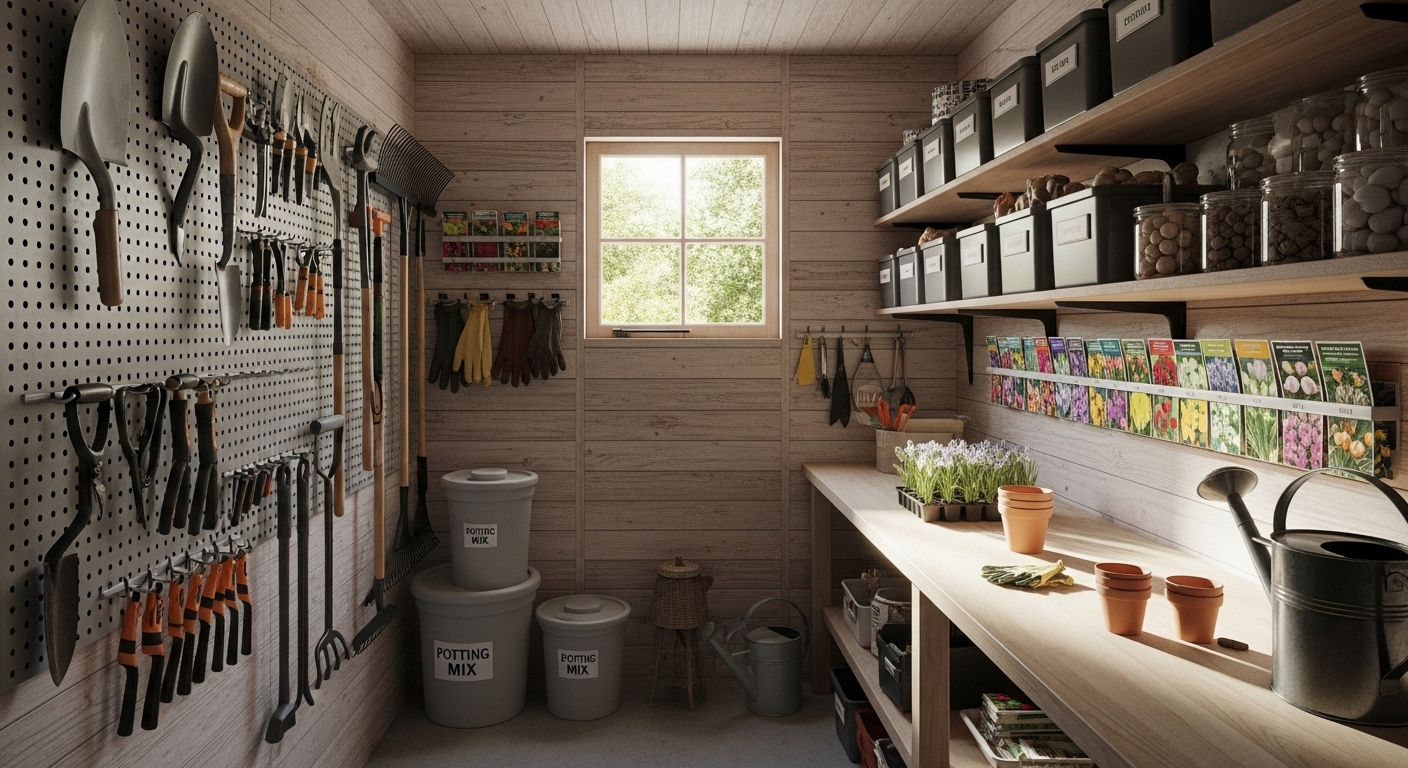
Organizing Strategies for Efficiency
Allow the fun to begin as the stage where you put the items back takes place. Remember, a trick to a functional shed is to make use of every single inch of the space you have.
Vertical Storage Solutions
The walls can become your greatest allies in a small shed scenario. The one most influential change that you can make is to get your items off the ground.
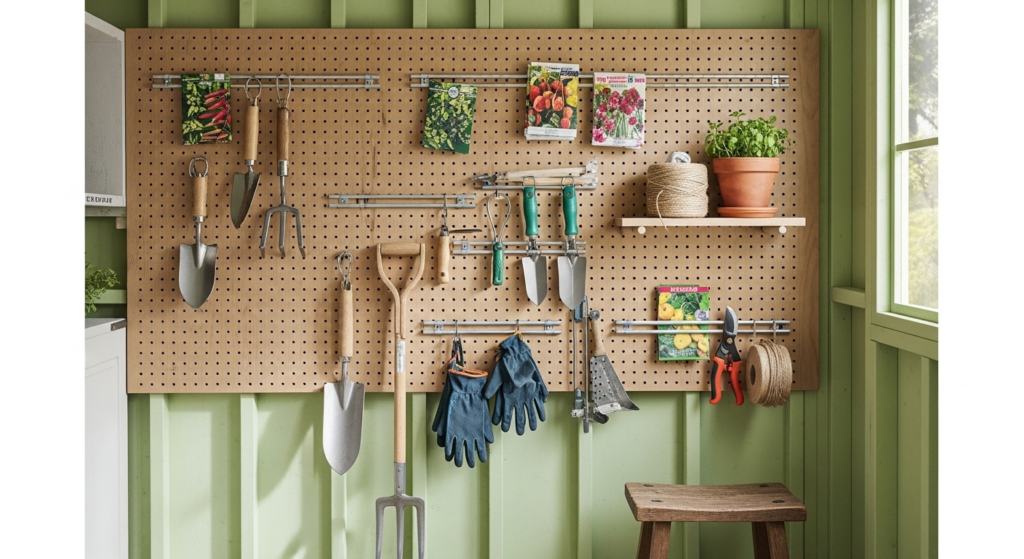
- Pegboards: Putting up a pegboard is a traditional step, and it is for good reasons. It is so adaptable. Your tool collection changes, and so can your hooks be rearranged. If necessary, use a permanent marker to mark your tools on the board so you will always be reminded of their designated places.
- Track Systems: In the case of heavier items, you can go for a metal track system. These rails get mounted to the studs, and they allow the use of strong hooks that can hold weed whackers, heavy shovels, and even wheelbarrows.
- Magnetic Strips: A very powerful magnetic knife strip (like those found in the kitchen) is a perfect tool for small metal garden tools such as pruning shears, screwdrivers, and precision weeders. It is best that you install it at eye level on top of a workbench.
Categorizing Tools and Supplies
Organize things by what they do instead of going by how big they are. Put all your digging tools in one place, pruning tools in another, and lawn care products in a different spot. The “zoning” approach allows you not have to go back and forth across the entire shed to perform a single task.
- The Potting Bench: Make a potting corner in your garden shed if you have the space. Under it, you could store soil and pots in bins. On the shelves above, place seeds, string, and tags.
- The Chemical Zone: The fertilizers, herbicides, and insecticides should be stored together on a top shelf or in a locked cabinet. It means that they will be safe from children and pets and kept dry.
Utilizing Containers and Bins
Cardboard boxes are the right environment for bugs, and they attract them, plus they also won’t last in a damp garden shed. So, instead of that, get some sturdy plastic bins that are clear and have lids with clasps.
- See-through counts: Clear bins allow you to identify their contents without having to open them, thus sparing you the trouble of digging through multiple boxes just to find birdseed.
- Mark everything: Make use of a label printer or a permanent pen and masking tape. Labels remove the confusion when it comes to fetching and also make it easier for other members of the family to know where to put things back.
- Make good use of repurposed items: It does not always mean that you have to buy new. Old metal pails can be very useful for holding hose nozzles or sprinklers. A wooden crate that has been repurposed will serve the purpose of holding hand tools quite well.
Maximizing Space in Small Sheds
Without additional space, you will have to rely on your ingenuity as well. Discovering how to organize a garden shed depends largely on your ability to think creatively.
Optimizing the Layout
Always have the most frequently used items in the prime real estate zone. Here we mean the middle area between your eyes and waist level, and close to the door.
- Door Storage: Do not neglect the inside of the back door of your shed. Put some shallow wire baskets to hold the gloves, twine, or small tools. Just be sure that the baskets do not obstruct the closing mechanism of the shelves when the door is closed.
- Overhead Storage: Your gaze should be directed up. The space between the rafters is generally ignored, and so is wasted. Use plywood panels or install heavy-duty hooks all along the beams to create a loft for things that are light but bulky, e.g., PVC pipes, pieces of lumber, or patio umbrella covers.
Seasonal Storage Rotation
A shed changes alongside your gardening activities. This should be reflected in your layout as well.
- Summer Mode: Your lawnmower and weed whacker must be allowed to have the most prominent positions. Snow shovels, together with ice-melting chemicals, can be kept in a corner at the back or placed in the attic.
- Winter Mode: When it is time for the first frost, change the layout also. Move your mower to the back room. The snowblower, together with shovels come forward. Wash your pots and store them for the winter.
Making Use of the Exterior
Some items are tough enough to withstand the elements, and therefore, you do not have to let them take up precious interior space. For instance, you may hang a few hooks outside the shed to coil your hoses or to lean ladders. Another idea is to position your potting bench next to the shed so that you can have more room for storage inside.
Maintenance: Keeping the Chaos at Bay

You made it through the hard part. Your shed is looking magnificent. However, now you want to be able to enjoy it for quite some time to come, so it is best that you keep up with it.”
The “Put-Back” Rule
A golden rule of an organised shed is simply put, that you should put it back where you found it immediately. Do not think of the shovel as if it is just “for a second” that you are leaning it against the wall. Take the extra ten seconds to hang it on its designated hook. When you have used up the last of the fertilizers, you should throw the empty bag straight into the garbage without any delay.
Regular Cleaning Schedule
There is no avoiding dirt in a garden shed, but you can definitely avoid it from becoming a deep-seated filth.
- Weekly: Give the floor a fast shake-up and broom sweep. Rugs and mats would be a good idea to be shaken out.
- Monthly: Pest signs can be checked. There could also be a wipe-down of your workbench.
- Annually: Do a partial version of your first yearly spring cleaning. Pull everything out, sweep thoroughly, and reassess if your organization’s system is still effective.
Re-evaluating and Adjusting
At times, you feel like you need to change your gardening style. It may be that you have ceased growing vegetables, and flower beds have been your focus. Perhaps you have just brought home a battery-powered mower to swap it for a gas one. Storage requirements always go hand-in-hand with these kinds of changes. It is okay to relocate hooks, buy new kinds of bins, or rearrange shelves. An annoying system will not be used, and clutter will become the norm once more. So your frustration, in fact, tells you how to solve the problem.
Enjoying Your New Garden Sanctuary
Going through the exercise of reorganizing your shed is far from trivial and indeed results in an improved space that is functional and, most importantly, supports your passion for gardening. A shed that is orderly is a great time saver, a money saver, and it just makes for a more pleasant experience working in your garden. Take good care of it, and it will serve you for many years to come.
Enjoy your shed with pride, keep it clean and functional, and let it be the efficient headquarters your garden deserves. Your shed will stay a productive sanctuary if you plan and maintain it regularly.